Summary: The 35-ds3chipdus3 is an efficient performance chip/firmware module for upgrading embedded systems, gaming controllers, Internet of Things devices and older PCs. To install this device one needs ESD safety environment, existing hardware/software compatibility, old hardware seating or embedded software deployment and full drive installation. It takes about 30–60 minutes for the whole installation process and brings the objectives such as improvement in booting up speed, multitasking and power-Efficiency.
Your system is sluggish. Starting timesare lagging. Programs lagwhen stressed. But is pouring money into new equipment the right approach? Maybe not. There‘s a targeted upgradethat, you‘ll find, can be the best budget decision of the year. Find out how to install 35-ds3chipdus3and do it the right way, in this tutorial.
What Is 35-ds3chipdus3?
The 35-ds3chipdus3 is a specialized performance chip and firmware module designed to optimize embedded system performance. It is widely adopted across open-source and commercial environments for its compatibility with multiple platforms, streamlined code execution, and support for security protocols.
In practical terms, it surfaces in several hardware contexts:
- Gaming controllers — reduces input lag and improves responsiveness
- Motherboards and embedded boards — facilitates faster data transfer between components
- IoT devices and custom circuit boards — enables firmware customization and automation
- Older PCs and desktops — extends usable lifespan without a full hardware replacement
Depending on your version, installation may mean physically seating a chip on a motherboard or deploying a software/firmware package on an existing device. Both paths are covered below.
Who Should Install 35-ds3chipdus3 — and Who Shouldn’t

Good candidates for this upgrade:
- Business owners running aging workstations that struggle with modern software
- Developers and engineers working with embedded systems or IoT hardware
- Gamers seeking reduced controller lag without a new console
- IT managers looking to extend hardware refresh cycles on a budget
Think twice if:
- Your motherboard slot or device firmware is incompatible — installing an unsupported chip can prevent your system from booting at all
- You are not comfortable opening a case or running an install script with elevated privileges
- Your device is still under manufacturer warranty — check the terms before modifying internal hardware
Before You Begin: Compatibility Check and Tools
This is the step most guides skip — and it is the one that causes the most problems. Verify compatibility first.
Check your motherboard or device manual for supported chip types and available slots. Confirm your power supply meets the chip’s voltage requirements. If you are installing the software/firmware version, verify that your operating system (Windows, macOS, or Linux) is on the supported platform list.
Tools and supplies you will need:
- Anti-static wrist strap
- Screwdriver set (Phillips head)
- Clean, flat, non-carpeted workspace
- Magnetic parts tray or small bowl for screws
- The 35-ds3chipdus3 package (from an official or verified source only)
- Your device or motherboard manual
A note on workspace safety that cannot be overstated: sensitive chips like this one can be permanently destroyed by a static discharge too small to feel. As Dell’s hardware safety documentation explains, you should disconnect all cables, press and hold the power button for five seconds after disconnecting, and continuously touch an unpainted metal surface to reach zero electrostatic potential before handling any internal component. This step protects both you and the hardware.
How to Install 35-ds3chipdus3: Physical Hardware Installation
Follow all these steps in order. Missing out any step.
Step 1: Power Down and Discharge
Completely shut down your computer don‘t put it in sleep mode, actually turn it off. Disconnect the power cable. Hold down the power button for 10 seconds to bleed the residual current from the capacitors. If you have a laptop, remove the battery.
Step 2: Prepare Your Workspace and Ground Yourself
Place the computer on a table or floor that is hard and not carpeted. Clip your anti-static wrist strap to an unpainted metal section of the case of the computer. Do not wear synthetic clothes wool, fleece, and polyester generate static electricity when rubbed against each other. As per the Guidelines for Handling NetScreen Hardware Components issued by Juniper Networks, electrostatic voltages as low as 30 V (volt), which cannot be felt, damage the components; therefore, grounding yourself is entirely necessary.
Step 3: Open the Case
Unscrew the side panels and place the screws in your magnet tray. Place the panel in a safe place. Do not touch any interior parts until grounded and ready to move forward.
Step 4: Locate the Installation Slot
Just makesure that you know which is the correct slot for 35-ds3chipdus3 (check your motherboard manual) (do not guess). An incorrect slot can damage both the chip and the board.
Step 5: Remove the Existing Chip (If Present)
If you are changing an older chip, gently unlock the locking clips on both sides of the slot. Slide the chip to the side and out horizontally (do not cut or jerk the chip out). Drop the chip into an anti-static bag immediately.
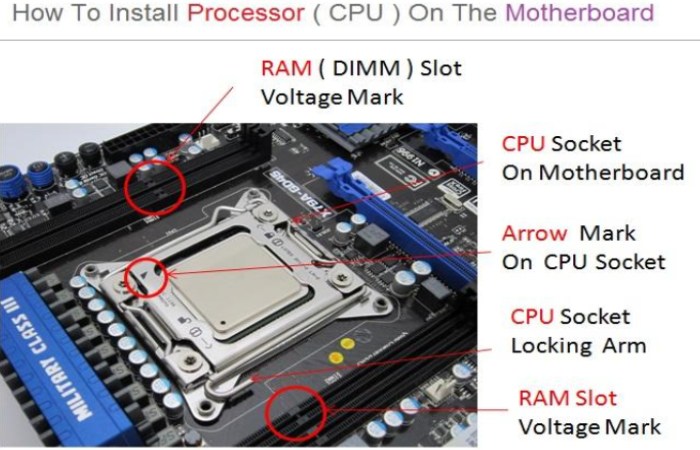
Step 6: Align and Seat the New Chip
Carefully take the 35-ds3chipdus3 out of its anti-static bag when you are ready to install it. Find the Pin 1 indication (a small triangle or dot on a corner of the chip). Match it to the situation indicator located on the slot. Place the chip down, not at an angle, and press evenly into place. The chip will be pushed down with plenty of pressure until you hear or feel it click. Use the edges to pick up the chip. Do not touch any contacts, pins or circuitry.
Step 7: Visual Check Before Closing
Before replacing the side panel, give it one more check. Make sure that the chip is present and fully seated. Make sure none of the cables were disturbed. Did a screw come loose and is there one floating around in the case. This can cause a short circuit to occur when you turn the PC on. If all is in order, replace the side panel, replug the cables in and turn the PC on.
How to Install 35-ds3chipdus3: Software / Firmware Installation
If your version is a software module or firmware package rather than a physical chip, the process is different — but equally methodical.
Step 1: Download from a Verified Source
Only download the 35-ds3chipdus3 package from the official repository or your organization’s approved deployment source. Never use third-party mirrors. Scan the downloaded file with your antivirus tool before proceeding.
Step 2: Extract the Package
Use a reliable decompression tool (WinRAR, 7-Zip, or the native OS extractor) to unpack the .zip or .tar.gz file to a local folder.
Step 3: Run the Install Script with Elevated Privileges
On Windows, right-click the installer and select Run as Administrator. On Linux, execute the appropriate script:
sudo ./install_35-ds3chipdus3.shFollow the on-screen prompts. Accept default installation paths unless you have a specific reason to change them.
Step 4: Set Environment Variables
Add the module path to your system’s environment settings as directed in the installation documentation. This ensures your OS correctly identifies and communicates with the new module.
Step 5: Restart Your System
A reboot is required for the changes to take effect. Do not skip this step — running the module without a restart can produce false errors or incomplete initialization.
Driver Installation and Post-Install Verification
Hardware installation is only half the job. Without the correct drivers, your operating system cannot communicate properly with the 35-ds3chipdus3.
Visit the manufacturer’s official support page and download the latest driver package for your operating system version. Run the installer and restart again when prompted. This ensures full recognition and optimal performance from the chip.
Once rebooted, use a benchmarking utility to verify the upgrade. Free tools are widely available that measure processing speed, thermal behavior, and system responsiveness. Run a baseline test before and after installation to confirm the improvement is real and measurable. Cadence’s guidance on ESD handling and hardware verification also recommends checking component datasheets post-install to confirm operating parameters are within spec, particularly for embedded and IoT applications.
Common Mistakes That Derail the Installation
- Skipping the compatibility check. Incompatible firmware can prevent your device from booting entirely.
- Rushing the physical seating. A chip that looks seated may not be fully engaged. Press until both locking clips click.
- Ignoring ESD precautions. A single static discharge can cause invisible, cumulative damage that leads to crashes weeks later — not immediately.
- Downloading from unverified sources. Malicious installers exist that mimic legitimate firmware packages.
- Not updating drivers after installation. Hardware recognized by the OS but running on outdated drivers will underperform significantly.
What to Expect After a Successful Install
Users who complete the process correctly consistently report:
Significantly faster start-up times
- Minimized time to application load
- More efficient multitasking when CPU is loaded with tasks
- Lower system temperatures as a result of improved energy efficiencies.
- In the gaming set-ups, lower controller lag and more stable frame rate.
For older systems, this upgrade can add 2–3 years of hardware life a good ROI relative to the cost of new hardware, especially for small businesses and IT departments with large device estates.
Troubleshooting: When Something Goes Wrong
Device does not power on after install: The chip has probably not been fully seated. Remove the cover, unlock the clips and replace it firmly.
OS does not recognize the chip: Confirm you have the latest drivers installed. If still failing, try removing and re-inserting the chip and see if your motherboard manual guides you to a compatible slot.
Overheating post installation: Insert eye and observe contact of chips to the board. If you had used thermal paste as part of your specific installation, check it looks to have been applied accurately and not moved.
Installer won‘t open (software version): Right click and run as Admin. If still blocked by AV: temporarily shut/disable real-time scanner, install, then re-enable.
If none of the above troubleshoots the issue, try calling the manufacture‘s support line one on one another problem may be due to a firmware incompatibility of your revision.
FAQs
Q: How long is the install for 35-ds3chipdus3? The total time from beginning prep to the final verification will be approximately 30 minutes for seasoned installers and closer to an hour for first-timers.
Q : Is 35-ds3chipdus3 available for laptops? The actual physical installation of the chip is much harder on a laptop, due to space constraints. However, the software/firmware version is usually more suitable for deployment onto a laptop. Check your specs before you try either.
Q: Will 35-ds3chipdus3 work in a VM? Possibly: you would probably have to enable USB pass-through or similar, depending on what device the driver or chip is attached to in your VM.
Q: Do I have to reinstall the OS after installing this chip? No. OS needs only a driver installation and system restart, nothing more. OS reinstallation is not necessary.
Q: How much does 35-ds3chipdus3 cost? Various models are often available through open source repositories at no charge. Access to premium hardware models through vendors can range in the 500+ depending on your location and the version needed.
Q: Will this work on Windows, Mac or Linux? It will work on all three OSs. Procedure and the script commands are same but the Installation procedures are different.
Conclusion
Proper installation of 35-ds3chipdus3 is what distinguishes a noticeably faster running system from a system that refuses to boot. It is straightforward, not complex but it does require diligence, ESD precautions, and time to do seating and verification correctly. Whether you install the physical chip onto an embedded-board or roll out the firmware module to thousands of enterprise end-user systems, you can use the above procedure to be consistent, safe, and successful.
If you have several devices to do hardware upgrades, upgrade firmware, optimize IT infrastructue, and use professional help, infointec.com will do it well at a large scale.